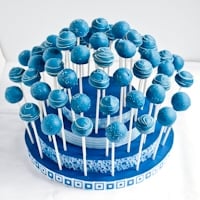
Baby Blue Cake Pops
These Blue Cake Pops combine a sweet white cake filling with a dark blue coating for a sweet treat that's perfect for baby showers and birthday parties!
Print
Pin
Servings:
Calories: 163kcal
Ingredients
- 1 box white cake mix (plus whatever eggs and oil are required)
- 1/4 - 1/3 container vanilla frosting (from a 16oz container)
- 24 cake pop sticks
- 24 ounces white candy melts or chocolate chips
- 1/2 teaspoon coconut or vegetable oil
- Navy Blue Oil Food Coloring
Instructions
- Mix the cake ingredients and bake according to package instructions. Want brighter cake? Add food coloring to the batter. For this cake, I added about a 1/4 teaspoon of blue gel food coloring to the cake batter.
- Allow the cake to cool, then crumble into a very large bowl - feel free to use your fingers if you're the messy type, I prefer a wooden spoon.
- Add spoonfuls of icing to the crumbs and mix. Don't go too nuts here - if it's too squishy it will fall off the sticks. A regular box mix doesn't usually need even 1/3 of a container of frosting. Cakes that are naturally more moist need even less. The only way to know it's ready is to roll a tight ball. If it is crumbly, add another small spoonful of frosting again and stir.
- Roll into balls tightly with your hands. For special occasions, you can also shape the balls into different shapes (footballs, squares, eggs, etc).
- Place on a cookie sheet and freeze for at least 2 hours. This is especially important if you're putting them on sticks later.
- Melt the chocolate chips along with the oil in the microwave (stir every 45 seconds) or in a double boiler. Add a few drops of the oil food coloring until you get the color you'd like.
- Push the stick into the frozen ball no more than half way then dip into the chocolate, twirling to coat. Use a toothpick to clean up any drips.
- Place the cake pop sticks in a styrofoam block, egg carton, or cardboard box so they stand up straight to dry.
- To decorate, you can sprinkle with coarse sugar while they're still wet, or let them dry then drizzle with additional melted white chocolate.
Notes
Make Ahead Options:
- The cake can be made up to 1 day ahead, covered, and stored at room temperature. The balls can be rolled and frozen for up to 6 weeks.
Nutrition
Calories: 163kcal | Carbohydrates: 28g | Protein: 1g | Fat: 5g | Saturated Fat: 4g | Polyunsaturated Fat: 0.5g | Monounsaturated Fat: 0.4g | Trans Fat: 0.1g | Sodium: 171mg | Potassium: 15mg | Fiber: 0.2g | Sugar: 20g | Calcium: 47mg | Iron: 0.4mg