How to Toast Coconut
May contain affiliate links. See our disclosure policy.
Learn How to Toast Coconut with three easy methods–in the oven, on the stove top, or in the microwave. We’ll be discussing the pros and cons of each method, and by the end of this post, you’ll be a pro at making toasted coconut for desserts, cookies, breakfast, and more!

Toasted Coconut: Like Sprinkles, but for Adults
We all reach a certain age where it no longer feels socially acceptable to add sprinkles to every breakfast and dessert we encounter. For me, it was 28. For most normal people, it was probably 13.
Either way, toasted coconut is here to fill the void the sprinkles left behind. Nutty, subtly sweet, and a tad crunchy, it’s the hero we deserve.
Just a dusting of golden sweet coconut elevates Oatmeal with Caramelized Bananas, Overnight Chia Pudding, and Quinoa Breakfast Bowls.
It adds pizzazz to Chocolate Covered Pretzels and Healthy Trail Mix, and it should win an Oscar for best supporting actor in Pineapple Coconut Cake.
I’m confident once you learn how to toast coconut, you’ll be using it to sprinkle happiness on all your favorite breakfasts and desserts. Whether you’re hosting an Epic Pancake Party or serving Amish Baked Oatmeal to your family, toasted coconut is a versatile topping you’ll want to keep on hand year round.
Today, I’ll be teaching you 3 different methods for toasting coconut. All of these work with both sweetened and unsweetened coconut and can be used for flakes or shreds.
Are you ready for your house to smell like a tropical cabana? Let’s dive in!

How to Toast Coconut on the Stove Top
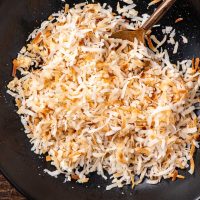
- Spread 1-2 cups coconut flakes or shreds over a large dry skillet.
- Cook over medium low heat for 6-7 minutes, stirring constantly, until the coconut is browned. Remove from heat and allow to cool.
Pros of the Stove Top Method
- No preheating required, just jump right in!
- This method is quicker than the oven method.
- The coconut gets wonderful crispy edges.
Cons of Toasting Coconut on the Stove
- Inconsistent browning– I had trouble getting the coconut evenly browned with this method. Some pieces got very dark, while others stayed pale.
- Constant stirring– You really can’t leave coconut alone on the stove top. It burns pretty quickly, so this method requires constant attention.
- You cannot make a large amount of coconut at once. The more coconut you have in the pan, the less even the browning will be.

Verdict:
If you’re easily distracted or impatient, this is probably not the method for you. However, I do still use this method when I don’t feel like heating up the oven or if I just need a small amount of coconut for my morning oatmeal.

How to Toast Coconut in the Oven
- First, preheat the oven to 350 degrees.
- Spread 1-3 cups of coconut shreds or flakes onto a parchment lined half sheet pan.
- Bake for 7-9 minutes, removing the coconut every 2 minutes to stir, moving the outer flakes to the center of the pan, and vice versa.
Pros of Oven Toasted Coconut
- In my tests, the oven toasted coconut was the most evenly browned.
- This coconut was nice and crispy, which I love!
- The oven method allows you to toast a lot of coconut at once. You can easily fit 3 cups of coconut on a half sheet pan, and you could even put multiple trays in the oven if you needed to.
Cons of Toasting Coconut in the Oven
- Oven toasted coconut requires heating up the oven, which in turn heats up the house.
- This is the longest method, mainly because you have to wait for the oven to preheat.
- The outer edges will toast and burn if you don’t stir the coconut every few minutes.

Verdict:
The coconut is evenly browned and crisp and this method requires the least active time, though you’ll still need to hang out in the kitchen for 10 minutes. SPOILER ALERT: This is my preferred method, particularly if I’m already heating up the oven to make cookies or dinner.

How to Toast Coconut in the Microwave
Place 1 to 1 1/2 cups shredded coconut in a large, shallow microwave safe dish. Microwave for 4-5 minutes, stirring every 30 seconds.
Pros of Microwave Toasted Coconut
- No need to preheat.
- This method is fast.
- The coconut was pretty evenly browned.
Cons of Toasting Coconut in the Microwave
- This coconut was slightly more soft and chewy than its oven and stove top counterparts.
- Hot spots– I’m not sure if this is just a problem with my microwave or this method in general, but I had hot spots in the coconut that burned. This was true whether I used a shallow glass bowl or a dark bowl. Each time, I was able to scoop out the small portion of the coconut that got burned, but this was still annoying and wasteful.
- Lots of stirring- To avoid the hot spots, I stirred every 30 seconds, which is A LOT of stirring.

Verdict:
Despite seeming more convenient, I actually found this method to be a pain. It was a lot of stirring, and I still struggled with hot spots. I likely won’t use this method very often. However, if you prefer the softer texture of fresh coconut, this is the method for you!
How to Store Toasted Coconut
Once you’ve settled on your method and toasted up some delicious coconut flakes, it’s time to store it! Toasted coconut should be cooled completely before storing. Keep it in an airtight container or zip top bag. It will keep at room temperature for up to a week or in the fridge for up to 1 month.

Toasted Coconut Recipes
Like I mentioned earlier, there are LOADS of ways to use toasted coconut! Use it as a topping for your morning oatmeal or Breakfast Banana Split, stir it into yogurt parfaits, or sprinkle it on hot chocolate, cupcakes, donuts, or pancakes.
I love using toasted coconut for these festive Toasted Coconut Shortbread Wedges and in my favorite Dark Chocolate Cranberry Coconut Granola.
It’s also a staple in my Almond Joy Cookies, Toasted Coconut Cherry Chocolate Chip Bars, and 7 Layer Bars.
For fellow coconut lovers, toasted coconut is a pantry staple you’ll want to keep on hand year round!
How to Toast Coconut
Ingredients
- 2 cups shredded coconut (sweetened or unsweetened)
Instructions
- Oven Method: (Preferred)
- Preheat the oven to 350 degrees.
- Place a sheet of parchment paper over a half sheet pan and spread the coconut on top of it in an even layer. Toast for 7-9 minutes, removing the pan every two minutes and stirring, moving the outer coconut shreds to the center and vice versa.
- Remove from the oven and allow to cool.
Stove Top Method:
- Spread coconut out in a large non stick pan. Heat over medium low heat, stirring often, for 5-6 minutes, or until coconut is fragrant and golden colored. Remove from heat and allow to cool.
Microwave Method:
- Place the coconut in a large shallow microwave safe bowl (preferably glass). Microwave for 3-5 minutes, stirring every 30 seconds. If hot spots develop, scoop out any burned coconut before returning to the microwave.
Notes
- How to store toasted coconut: Cool completely before storing. Place in an airtight container or zip top bag. Store at room temperature for up to 1 week or in the fridge for up to 3 weeks.